If your TV’s sound isn’t coming through your soundbar or home theater system, don’t worry, this issue is usually easy to fix. Incorrect settings or loose cables are the most common cause of sound problems, and you can often resolve them with a few quick checks. Follow the steps in this article, and check whether the issue is resolved after each step.
Note
- Menu names and options may vary by BRAVIA® TV model. If something looks different on your screen,
![]() If you are using a TV from another manufacturer, their support documentation can also help.
If you are using a TV from another manufacturer, their support documentation can also help. - If your subwoofer isn’t producing sound, start by checking the subwoofer sound troubleshooting article.
Quick fixes to try first
This section resolves most sound issues.
- Perform a power reset
A fresh restart often restores audio.
Note: Some soundbar models offer a software reset, follow the steps to reset your soundbar for detailed instructions.
- Turn OFF the TV and the soundbar or audio system.
- Unplug the power cords from the devices for 2 minutes.
- Plug the TV back in and turn it ON.
- Plug the soundbar back in and turn it ON.
- Check the volume:
Turn up the volume on both the TV and soundbar or audio system. - Check for mute:
Ensure the soundbar isn’t muted. Look for MUTING on the front display, or press the Mute button again. - Toggle NIGHT mode (if applicable):
Press the NIGHT mode button on the soundbar remote to turn it OFF/ON. - Make sure the soundbar is on the correct input:
Press the INPUT or TV button on the soundbar remote and make sure it’s set to TV. - If the sound is too low.
Some apps or channels output audio at a lower level. Test the soundbar with Demo mode:
- Press and hold the
 TV button on the soundbar for 5 seconds to turn Demo mode ON.
If the sound plays, the issue is with your TV or source device. - Press and hold the TV button on the sounbar for 5 seconds to turn Demo mode OFF.
If the issue persists, continue with the troubleshooting steps below.
Troubleshooting: connections, settings, and device updates
These steps will help you confirm the correct cable type, secure connections, and set the proper settings.
- Check your cable connections
A loose, defective, or damaged cable can cause an issue with sound.
- Turn OFF the devices.
- Disconnect the cables from the devices.
- Inspect the cable to ensure it's in good condition.If it isn't, replace it with a new one.
- Reinsert the cable, ensuring it is fully inserted and firmly seated in the HDMI ports.
- Confirm the cable is not loose or angled.
- Select the option that matches the ports on your TV and soundbar
If both devices have ARC or eARC ports, start with HDMI ARC/eARC. Otherwise, use the option that matches your ports.
- If the TV and soundbar or audio system have ARC or eARC HDMI® ports

- A - HDMI IN (ARC or eARC/ARC) on the TV
- B - High‑speed HDMI cable
- C - HDMI OUT (ARC or eARC/ARC) on the soundbar or audio system
- Connect the cable
- Connect one end of the HDMI cable to the TV’s HDMI IN (ARC/eARC) port.
- Connect the other end to the soundbar’s HDMI OUT (ARC/eARC) port.
- Adjust your TV settings
- Turn BRAVIA Sync control to On.
Tip
If your TV is a different manufacturer, check the supplied manuals to look for an HDMI‑CEC setting and turn it ON.
- Adjust your soundbar settings
- Set the Control for HDMI to On.
- In the HDMI settings, set the Audio Return Channel (ARC) or TV Audio Input mode to On or Auto. (skip if not available).
- Set the TV Audio Input mode to Auto. (skip if not available).
- If the TV, soundbar, or audio system does not have ARC or eARC ports.
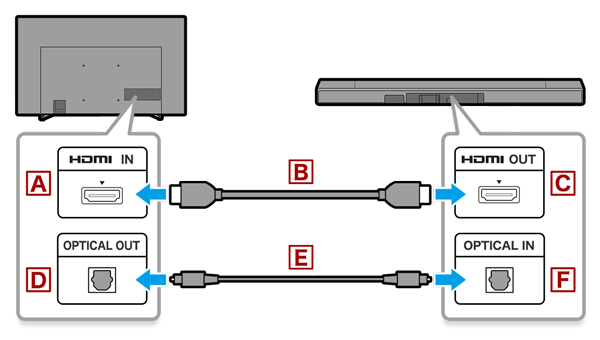
- A: HDMI IN port on the TV
- B: HDMI cable
- C: HDMI OUT port on the soundbar or audio system
- D: Optical OUT port on the TV
- E: Optical audio cable
- F: Optical IN port on the soundbar or audio system
- Connect the cable
- Connect an HDMI cable from the TV’s HDMI IN to the soundbar’s HDMI OUT.
- Connect an optical cable from the TV’s Optical OUT to the soundbar’s Optical IN.
- Adjust your TV settings
- Turn on HDMI-CEC (BRAVIA Sync on Sony TVs).
- Set Digital Audio Out to PCM.
- Adjust your soundbar settings
- Set ARC or TV Audio Input to OFF
- Set TV Audio Input Mode to Optical (if available).
- If using only an optical audio cable
- If using only an analog audio cable (3.5mm Stereo Cable)

- A: Analog Audio OUT on the TV
- B: Analog audio cable (3.5mm stereo cable, male-to-male)
- C: Analog Audio IN on the soundbar (if equipped) or audio system
- Connect the cable
- Using the analog audio cable, connect the TV's Analog Audio OUT port to the audio device's Analog Audio IN port.
- Adjust your soundbar settings
- In the HDMI settings on the audio device, set the Audio Return Channel (ARC) or TV Audio Input mode to OFF.
- Change the TV audio output setting
If you're using a BRAVIA TV, set the TV's Speaker setting to Audio System. These steps may vary; check your TV Help Guide for model-specific instructions if needed.
- Press the
 (Quick Settings) or HOME button on your tv remote control (depending on the model), and select
  Settings.
 - Depending on your TV’s software version, the menu labels may differ slightly. Choose the option that most closely matches your TV menu.
- Select Display & Sound → Audio output → Speakers → Audio system
- Select Sound → Speakers → Audio system
- Update your devices
Tip
You can download the latest updates from
![]() .
.
Still having issues?
If you’ve tried everything and the sound still isn’t working, your device may need repair. Go to Product Repair. .
 Need more help?
Chat with a skilled product enthusiast for quick how-to and troubleshooting help.
Need more help?
Chat with a skilled product enthusiast for quick how-to and troubleshooting help.

