"How headphones work"
Make your own headphones out of plastic bottles and milk cartons!
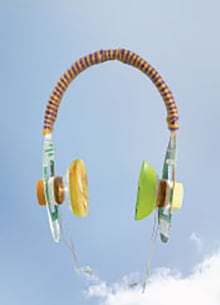
Materials
PET bottle ×2, 1-liter milk cartons×2, Polyvinyl formal enameled copper wire (thickness: 0.2 mm, length: 20 m) ×2, Magnet (cylindrical with 20-mm diameter) ×2, Audio connection cable (stereo mini plug at one end) x1, Wool yar, Cushion tape (sealing tape for windows, etc.), Paper template (can be downloaded from website)
*Enameled wire or polyurethane copper wire can also be used instead of polyvinyl formal enameled copper wire.
Tools
Box cutter, Cutter mat (anything that protects the desk, etc. from being damaged is fine), Scissors, Cotton work gloves, Needle-nosed pliers, Felt-tip pen or marker, Double-sided adhesive tape, Sandpaper, Adhesive tape, Rubber band

Caution!
The volume will vary depending on the thickness of the copper wire and how many times the wire is wrapped around the bottles. Be careful because the music player may break depending on the thickness of the copper wire and how many times the wire is wrapped around the bottles.
Be careful not to cut cooper wire while wrapping it. You can’t listen to music on your headphone if your cooper wire remain cut. Use the tools together with an adult.
Decide where you want to cut the bottle by placing a rubber band around it. Then draw a line with a pen.

Cut the plastic bottle with the plastic bottle scissors
(do this for both bottles).

Smooth the edges by cutting them in straight lines.

Put a rubber band to bottom side of the bottle and draw a line with a pen. Cut the plastic bottles along the line for both bottles.

Cut the bottom of the cut PET bottle into a round shape.

Smooth the edges by cutting PET bottle.

Attach the magnet to the bottom of plastic bottle.
* Handle the magnets with care because they are extremely powerful!

Wrap the copper wire around the PET bottle (both bottles). Leave the first 10cm of the copper wire and start wrapping.

Once you finish wrapping the wire, leave the last 10 cm of wire while securing the wire with a piece of tape or a sticker.

Put scotch tapes on 3 parts of the magnet side.

Put it into the top side, then fix all 3 parts.
 * Key point to fixing the magnet.
Align the right side of magnet and left side of the wire (coil) in a straight line. The sound quality will be different depend on the position of the magnet and coil.

Wrap the airtight tape on the edge of the plastic bottle with half the width of the tape and cut out over the circumferential length.

Make a cut in the airtight tape with 2cm width and turn down it inward.

The headphone part finished!

Let's put the airtight tape another headphone part!

Materials & Tools
Audio connection cable (one with stereo mini plug), Nipper.

Cut out the red and white pins.

Expose the copper wire.

Twist the exposed cooper wire.

The cable is ready.

Sandpaper off the edge of cooper wire for energization of a coil.

Together with tip of the audio cable.

Wrap the twisted part with Scotch tape.

Connect the other side of the wire with the audio cable and tape, too.

Tape the cooper wire and headphone in place.

Connect the other ear side with the audio cable and tape the wire with headphone.

Stick the patterns on the milk carton. Make 2 sets.

Using scissors, cut along the lines on the patterns. Fold in half and secure with a stapler and/or tape.

Match the size to your own head and attach the headphone holders to the headband.
Carefully bend the adjustment band so that it fits the shape of your head.

Adjust the headband to match the positions of your ears and secure the headphones to the headphone holders by attaching the caps.

Decorate your personal headphones by wrapping the headband with yarn and ribbons, and attaching beads.

Your handmade headphones are completed.
Let’s take a listen by plugging them into the headphone jack of a stereo system (audio player) or an audio output jack of a TV.
★ You may need an amplifier when using a Walkman.
★ If you turn the volume up, make sure to turn it back down before pulling the cable out.

Point
To listen with better sound, you will need to increase the resistance to the current flowing through the coils, which also means louder volume. You can increase resistance by using thinner wires or by increasing the number of times you wrap the wire around when making a coil. You can also increase the volume by using a bigger magnet.
Be creative and try different ways to make your headphones even better.
A sound is created through electromagnetic induction!
A sound is conveyed through vibrations (waves traveling through the air). When an electrical signal (electricity) from audio equipment, such as a Walkman, passes through a conductive wire, it interacts with the magnetic flux created by the magnet that the wire is coiled around, causing plastic bottle to vibrate. The vibrations of the plastic bottle in response to the electrical signal from the Walkman can be heard as music.
This phenomenon where electricity and magnetism affect each other is known as the “electromagnetic induction.”
In 1831, the British scientist Michael Faraday discovered that an electrical current flows through a coil when a coil wrapped with a conductive wire is moved in a way that cuts through the magnetic flux.


